Quickstart
RENT (Repeated Elastic Net Technique) is a feature selection method for binary classification and regression problems. At its core RENT trains an ensemble of \(K\in\mathbb{N}\) generalized linear models using regularized elastic net to select features. Each model \(k=1:K\) in the ensemble is trained using a randomly, iid sampled subset of rows of the full training data. A single data point can appear at most once in each subset, but may appear in multiple subsets. From these \(K\) unique models one can acquire weight distributions for each feature that contain rich information on the stability of feature selection and from which several adjustable classification criteria may be defined.
It is recommended to read the arXiv manuscript RENT - Repeated Elastic Net Technique for Feature Selection, which provides a deeper explanation of the method and is helpful to improve the understanding of RENT and the available analysis methods.
Statement of Need
Most feature selection methods provide only a subset of selected features from the original full set of features. However, they often lack information on whether the selection of the features can be considered to be robust or not. RENT adresses this issue by providing information on selection robustness and supports users to perform accurate and stable feature selection. Apart from selecting informative features, the package delivers information for interpretation of single objects across the ensemble model, as well as a validation study. In addition, post-hoc analysis can be used for further graphical interpretation and performance evaluation based on principal component analysis. The target audiences are machine learning practicioners and researchers from various domains where feature selection is of high importance.
Requirements
Make sure that Python 3.5 or higher is installed (preferably 3.8). A convenient way to install Python and many useful packages for scientific computing is to use the Anaconda distribution.
- numpy >= 1.11.3
- pandas >= 1.2.3
- scikit-learn >= 0.22
- scipy >= 1.5.0
- hoggorm >= 0.13.3
- hoggormplot >= 0.13.2
- matplotlib >= 3.2.2
- seaborn >= 0.10
Documentation
The following Jupyter notebooks provide a classification example and a regression example, illustrating the RENT workflow. Further, the Jupyter notebook about extensive hyperparameter search illustrates how elastic net hyperparameter search can be embedded in RENT training.
RENT repository on GitHub
The source code is available at the RENT GitHub repository.
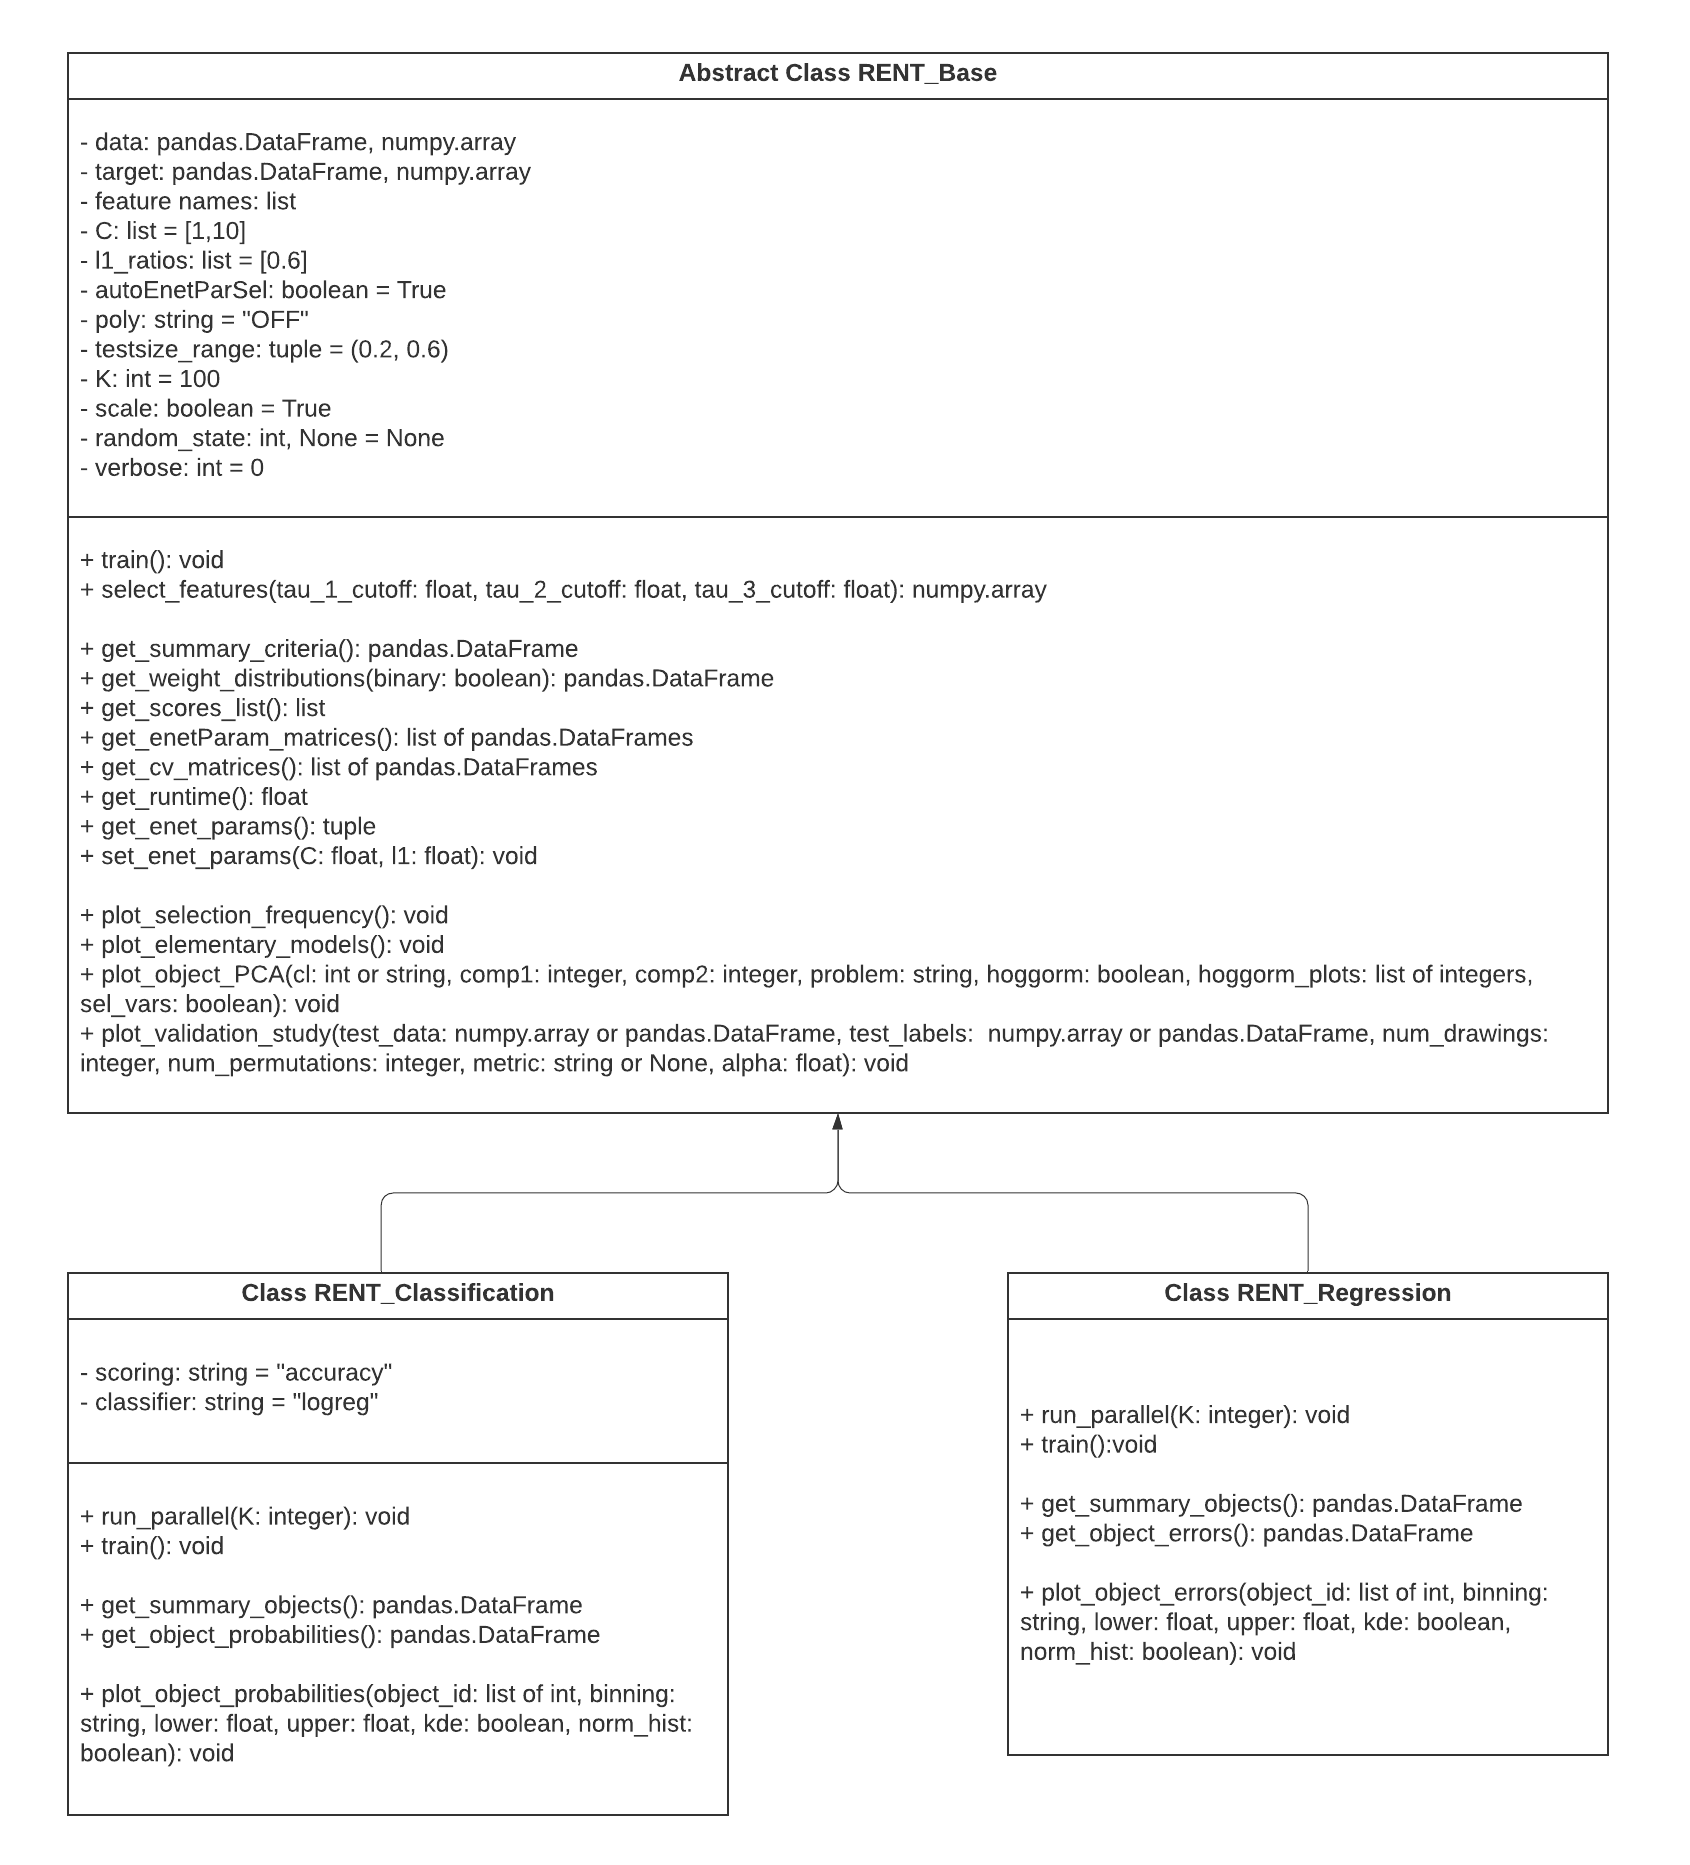
UML-Diagram
The UML-diagram provides an overview on the class-structure of the RENT implementation.
Testing
The correctness of the results may be checked using the test provided in the tests folder.
After cloning the repository to your disk, navigate to the RENT folder and install the requirements which are needed for testing.
pip install -r requirements.txt
pip install -e .
You can run both tests with the command:
tox .
tox runs the tests for all python versions in the tox.ini file, which are 3.7 and 3.8 for RENT. If only one version is installed on your computer, be aware that the program will throw an error for the not install version but run smoothly for the installed version.
To run a specific test (classification or regression), use the command line to navigate to the test folder. The code below shows an example of how to run the tests for classification.
pytest -v test_classification.py
or for the regression
pytest -v test_regression.py
After testing is finished, pytest should report that none of tests failed.
Note
In the test RENT is applied to the Wisconsin breast cancer dataset (for classification) and an artificial dataset (for regression). During the test, there will appear convergence warnings because the maximum number of iterations will be reached. The same is true for a runtime warning due to a true divide.
Classification Example
The following python example illustrates RENT on the Wisconsin breast cancer (classification) dataset, available from scikit-learn. First, we load and prepare the data. Then we initialize a RENT classification model, train it and select features. This example shows how to select features with RENT. For more examples including graphics and feature selection post-hoc analysis have a look at the example notebooks on the RENT GitHub repository.
import pandas as pd
from RENT import RENT

# Load dataset
train_data = pd.read_csv("examples/data/wisconsin_train.csv").iloc[:,1:]
train_labels = pd.read_csv("examples/data/wisconsin_train_labels.csv").iloc[:,1].values

# Build RENT model
# Define a range of regularisation parameters C for elastic net.
# A minimum of at least one value is required.
my_C_params = [0.1, 1, 10]

# Define a reange of l1-ratios for elastic net.
# A minimum of at least one value is required.
my_l1_ratios = [0, 0.1, 0.25, 0.5, 0.75, 0.9, 1]

# Define setting for RENT
model = RENT.RENT_Classification(data=train_data,
                                    target=train_labels,
                                    feat_names=train_data.columns,
                                    C=my_C_params,
                                    l1_ratios=my_l1_ratios,
                                    autoEnetParSel=True,
                                    poly='OFF',
                                    testsize_range=(0.25,0.25),
                                    scoring='mcc',
                                    classifier='logreg',
                                    K=100,
                                    random_state = 0,
                                    verbose=1)

# After having initialized the RENT model, we train it.
model.train()

# Actual feature selection step
selected_features = model.select_features(tau_1_cutoff=0.9, tau_2_cutoff=0.9, tau_3_cutoff=0.975)
print("selected features: ", selected_features)
#print output
selected features: [ 7 20 21 22 24 27]
Regression Example
The following python example illustrates RENT on a regression dataset, generated via the make_regression() function, offered in
scikit-learn.
First, we load and prepare the data. Then we initialize a RENT classification model, train it and select features.
This example shows how to select features with RENT. For more examples including graphics and feature selection post-hoc
analysis have a look at the example notebooks on the RENT GitHub repository.
import pandas as pd
from RENT import RENT
from sklearn.datasets import make_regression
from sklearn.model_selection import train_test_split

# Build dataset
data = make_regression(n_samples=250, n_features=1000, n_informative=20, random_state=0, shuffle=False)
my_data = pd.DataFrame(data[0])
my_target = data[1]
my_feat_names = ['f{0}'.format(x+1) for x in range(len(my_data.columns))]

# We split the dataset into a separate train and (unseen) test dataset.
# The test dataset might be used to evaluate a model, that is build on
# the features selected with RENT. This is not shown in this example.
train_data, test_data, train_labels, test_labels = train_test_split(my_data,
                                                                    my_target,
                                                                    test_size=0.3,
                                                                    random_state=0)

# Build RENT model
# Define a range of regularisation parameters C for elastic net.
# A minimum of at least one value is required.
my_C_params = [0.1, 1, 10]
# Define a reange of l1-ratios for elastic net.
# A minimum of at least one value is required.
my_l1_ratios = [0, 0.1, 0.25, 0.5, 0.75, 0.9, 1]

model = RENT.RENT_Regression(data=train_data,
                                target=train_labels,
                                feat_names=train_data.columns,
                                C= my_C_params,
                                l1_ratios=my_l1_ratios,
                                autoEnetParSel=True,
                                poly='OFF',
                                testsize_range=(0.25,0.25),
                                K=100,
                                random_state=0,
                                verbose=0)

# After having initialized the RENT model, we train it.
model.train()

# Actual feature selection step
selected_features = model.select_features(tau_1_cutoff=0.9, tau_2_cutoff=0.9, tau_3_cutoff=0.975)
print("selected features: ", selected_features)
#print output
selected features: [  0   1   2   4   5   6   7   8  10  11  13  14  16  17  19 835]